Mrs. T's Art Room
  • Mrs. T's Blog
  • Arts Integration
    • HOT Blocks
    • HOT Block Resources
    • Arts Integration Resources
  • Get Connected
    • Art Teacher Resources
    • Ed Tech Resources
    • Twitter for Educators
  • Professional Development
  • Other Sites

Painting... on the First Day of Art?!?

7/10/2018

1 Comment

 
It's summer and teachers everywhere are planning what they'll do during the new school year.

I'm planning on what I WON'T do anymore.

During the first week of art classes in my elementary art classroom, I used to spend a lot of time on rules. And procedures. And assigned seats. Don't forget the fire drill and lockdown drill procedure!

After a few years I noticed that my young students were bored.
"When are we going to do ART?"
"Are we painting today?"
​"What kind of art are we making today?"
And many of their behaviors made it perfectly clear that they were NOT engaged. You know what I mean, right?

So, a few years ago I saw that Ted Edinger tweeted about having his students paint on the first day of art. Say what? PAINT ON THE FIRST DAY? Surely, he was kidding.

Nope. He wasn't. And I decided I was going to do it too.
Picture
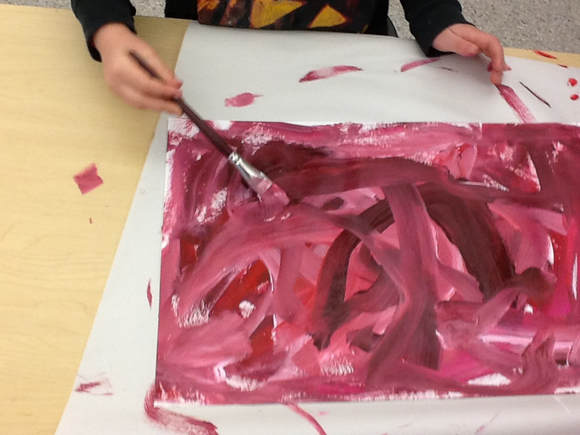
They loved painting on the first day of art! Before each class I made sure all the paints, tables and supplies were ready. I quickly went over the class list, showed them their seats, and then intro to paint! We painted dots like Mr.E did and we hung them up.

Want to be crazy like me and Mr. E? Just make sure all your students know to bring their smocks in right away and be prepared for some excited young artists!
​
This post is a part of The Art Ed Blogger's Network: Monthly Tips and Inspiration from Art Teacher Blogs. On the second Tuesday each month, each of these art teacher blogs will post their best ideas on the same topic.

Participating Art Teacher Blogs:

  • Art Class Curator
  • Art Ed Guru
  • Art is Basic
  • Art Room Blog
  • Art Teacher Tales
  • Art with Mr. E
  • Arte a Scuola
  • Brava Art Press
  • Artful Artsy Amy
  • Capitol of Creativity
  • Create Art with ME
  • MiniMatisse
  • Mona Lisa Lives Here
  • Mr. Calvert's Art Room Happenings
  • Mrs. Boudreaux's Amazing Art Room
  • Mrs. T's Art Room
  • Ms. Nasser’s Art Studio
  • Party in the Art Room
  • shine brite zamorano
  • Tales from the Traveling Art Teacher
  • There's a Dragon in my Art Room
  • 2 Art Rooms
1 Comment

6 Ideas: Student Independence in the Art Studio

5/8/2018

0 Comments

 
Managing materials and supplies in an elementary school art room can be difficult! Since students in my art room choose what to create, they need to be able to set up and clean up their work spaces. Here are a few ways I set up different centers to help my 2nd through 5th grade kids to work independently.


Make it easy for students to help themselves, within limits​
​
When I first set up these places for students to help themselves to construction paper, a student said to me, “Mrs. T, you are getting better every day!” That made me smile! Students were happy to have more choice in their art studio. If you spend time in the beginning of the year showing students how to set up and clean up their workspace, they have more ownership of their work.
Picture
Create a basic supply table or space

​
Right next to the supplies, add photos of how the materials and tools should look like when put away properly. This helps students know exactly what “cleaned up” should look like when class is over. You cannot assume that students will know what your expectation of “cleaned up” looks like!
Picture
Help students learn how to be independent and responsible

​
Obviously, re-teach and review procedures as needed. As teachers, we can determine what each class needs and which students might need more practice or direction. Steps can be listed on the wall of the center, or you can create smaller versions for students to take to their workspace. ​
Picture
Create videos to ensure each class gets the same instructions

​
If you need to re-teach, you could do it “live, in person” for a small group, or just show the video to the whole class again. Try to keep your videos three minutes or less. It is better to make two shorter videos than one big, long one.
Sharp pencils and the “sharpen me” basket

​
This cuts down on, “I need to sharpen my pencil” requests. Set up your pencils this way! Have a bucket with sharp pencils, and a basket for pencils that need sharpening. Students can take a sharp one, when they return it, they need to decide where it should go!
Picture
Have other students help when their classmates need a reminder

​
Many times, when a student asks me where something is (or where it should be put away), I don’t answer if this is something they should know. Nearby students help their friend! Bonus: I am no longer the only “teacher” in the room!

Do you have any other ideas to increase student independence in the art studio? Let chat on Twitter, or leave a comment below!
​
​This post was first published on Education Closet.
Art Teacher Blogs This post is a part of The Art Ed Blogger's Network: Monthly Tips and Inspiration from Art Teacher Blogs. On the first Tuesday each month, each of these art teacher blogs will post their best ideas on the same topic.

Participating Art Teacher Blogs:

  • Art Class Curator
  • Art Ed Guru
  • Art is Basic
  • Art Room Blog
  • Art Teacher Tales
  • Art with Mr. E
  • Arte a Scuola
  • Artful Artsy Amy
  • Capitol of Creativity
  • Create Art with ME
  • MiniMatisse
  • Mona Lisa Lives Here
  • Mr. Calvert's Art Room Happenings
  • Mrs. Boudreaux's Amazing Art Room
  • Mrs. T's Art Room
  • Ms. Nasser’s Art Studio
  • Party in the Art Room
  • shine brite zamorano
  • Tales from the Traveling Art Teacher
  • There's a Dragon in my Art Room
0 Comments

Flipping the Art Room: More Time for Student Work

3/9/2018

0 Comments

 
Do your students ask you for more time to create? Mine do! It is hard for my elementary artists to stop, clean up and then wait a whole week to start creating again. It is impossible to add more time for art in the schedule, but flipping the art room can really help.
Picture
Just last week, one of my fifth grade students tried to make more time to work: she added ten more minutes on the timer I had set to alert us it was clean up time. Good thing I realized this before the classroom teacher arrived! Nice try by a passionate artist.

There is a better way to find more time for students to create. Flipping a lesson means that students get more work time at school because they learn concepts before class starts. Since I teach in an elementary school, I do a modified flip by creating short videos that the class watches at the beginning of class. My students retain the information longer and can’t interrupt. Less interruptions = more time for them to work!
Picture
My first flipped lesson happened out of necessity. One particular class kept missing their art time for one reason or another. They were in the middle of a clay project and had to finish it because a holiday vacation was coming up. It was almost impossible to keep the clay workable that long! So I created a video, and sent them the link in Google Classroom to watch at home. At seven minutes long, it was a bit longer than I would have liked, but it got the job done. When my students came in the next day, they knew exactly what to do to finish their projects.​

Another good reason to me flip a lesson is because I know the demonstration will be too long. I created a timelapse video of making a craft stick basket. The students love this project, but it is challenging for some fifth grade students. To make sure they have enough class time to work, I have them watch this, a thirty minute process that is whittled down to three minutes!
So, how did I set this up? Like this:
Picture
I found that recording this way was really easy, and the students could see exactly what I was doing. I used the time-lapse video setting on the camera and then edited the video in iMovie. No audio, just notes and a few titles that I created while I was editing. And the best part? Students could watch it again and again while I helped other students.

Give your students more time to create and maximize teacher-student interaction time. Try flipping a lesson and see how it works. No time to create a video? See if one already exists on YouTube!

Maybe your students will want to make a craft stick basket… I know there’s a decent video for that!


Let me know how it goes! Write a comment below 🙂

This post was first published on Education Closet, January 2017.

0 Comments
<<Previous

    Amy Traggianese

    Visual art and arts integration with a techie twist!
     
    I don't like disclaimers, but: none of my ideas expressed in this blog post or website are supported or endorsed in any manner by my employer or anyone else. I just write it as I see it, and that is that.

    Picture
    Picture
    Picture

    This website uses marketing and tracking technologies. Opting out of this will opt you out of all cookies, except for those needed to run the website. Note that some products may not work as well without tracking cookies.

    Opt Out of Cookies
    Picture

    Archives

    July 2018
    June 2018
    May 2018
    April 2018
    March 2018
    February 2018
    January 2018
    November 2017
    August 2017
    April 2017
    November 2016
    September 2016
    March 2016
    January 2016
    October 2015
    August 2015
    July 2015
    June 2015
    April 2015
    March 2015
    February 2015
    January 2015
    November 2014
    October 2014
    September 2014
    August 2014
    June 2014
    May 2014
    January 2014
    December 2013
    November 2013

    Categories

    All
    Art Ed Bloggers Network
    Arts Integration
    Bottle Cap Mural
    Cave Art
    CCSS
    Choice Art Studio (TAB)
    EdCamp
    EdTech
    First Grade
    GAFE
    Henna
    NCAS
    NGSS
    Online Resources
    PLN
    STEAM
    Teaching Art
    Twitter
    Video
    What Is Art?

    Picture
    Picture

    RSS Feed

    This page contains affiliate links from Amazon.
    We earn a small percentage of the sales made through these links at no extra cost to you.
    Thanks for your support.
Powered by Create your own unique website with customizable templates.